Step-By-Step Tutorial On How To Setup Custom Domain
Hello... I'm sure you've noticed or maybe not, that we've moved to a custom domain. Here is what you need to do if you want to move, too... just a little help. yaaaaaaaaaaaaaaaayyyyy!
Am so happy that I've finally accomplished it. It was such a Yes-No-Yes-Not Sure-Yes kinda decision as there were so many unanswered questions, a zillion queries buzzing through my mind, and much more. I asked around and realised most of my blogger friends were as clueless as myself and so the entire last week has been all about research and research. It did look like a daunting task in the beginning, but once I understood the nitty-gritty it really was okay. The move is a one-time thing and then you don't have to worry about it anymore.
I always wanted to own a custom domain and finally after a parking my chosen domain name, I finally took the plunge with GoDaddy to register ICynosure.in at a great price. So here it is for you.
Once you decide to go with a custom domain, first register your chosen name with any registrar you wish and then follow the steps outlined below. I've tried my best to keep it simple and self-explanatory, but should you have any queries do not hesitate to contact me.
Go to Blogger Settings; Basic; Publishing
Click Add a Custom Domain; Input the Domain Address; Save
Custom Domain Address in my case is www.icynosure.in
Once you Save, you will get an error message. And that's absolutely fine, cause you are getting some important information from there. Check marked circle.
Info to input in Domain Registrar's Zone File Editor Page (Check Image 6 below)
Also for the option "Where would you like to host your blog?"
Of the two options choose - On a top-level domain (www.example.com).
Next step is to update your blog details on the registrar account.
Go to GoDaddy (or which every host you got your domain from);
Domain Dashboard; Select Domain Name; Launch
You will be directed to Domain Details page.
Click on DNS Zone File; Edit
A new window opens to display a Zone File Editor.
Go to CNAME (Alias); Input Blogger Error Details (Image 3); Click Save Zone File
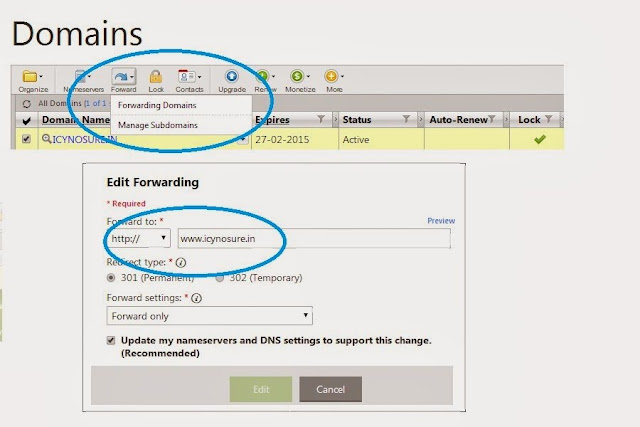
You're almost done... Now Go back to the Domain Dashboard and launch.
Select Domain; Forward; Forwarding Domains; Add Custom Domain; Save
Tada... you're done.
Now wait a couple of hours and you are ready to flaunt your new URL. Congratulations!
Hope this helps. Do leave me your comments about this tutorial, whether it has been helpful or not.
~ Heena


0 comments